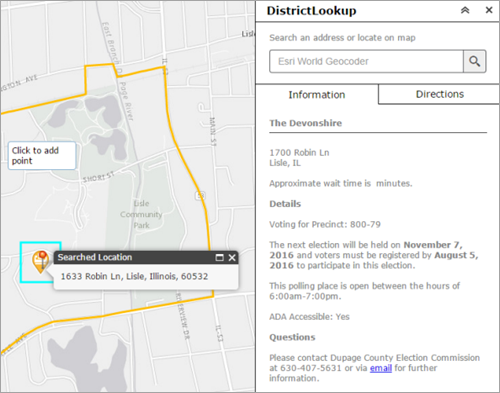
The District Lookup widget allows you to find a point feature related to a selected polygon, view detailed information about the features, and get directions to the selected point feature.
The structure of the layers requires a relationship between a point feature and a polygon feature and must be a one-to-one geodatabase relationship.
Configure the District Lookup widget
This widget can be set to open automatically when
an app starts. To enable this feature, click the Open this widget automatically when
the app starts button  on the widget, which turns it dark
green.
- Hover over the widget and click the Configure this widget button
 to open the configuration properties dialog box.
 - Optionally click the Change widget icon button and replace it with an image of your own.
A file explorer window appears, allowing you to select a local image file to use as the widget icon.
- To configure the Search Source Settings section, see Configuring the Search widget. It follows the same configuration steps as the Search widget.
- In the Search Settings section of the widget configuration, specify the following options:
- Select layer—Click Set to define layers. On the dialog box, define the following parameters:
- Select polygon layer
- Select point layer related to polygon layer
- Set location button—Enabling this parameter causes the Set location button to appear next to the search box. Click the Set location button, and click the map to set the search location. If you don't enable this parameter, clicking the map will automatically set the location.
- Select symbol to highlight polygon—Select the display symbol, color, transparency, outline color, and outline width to be used to highlight the polygon.
- Address or location symbol—Select and adjust the symbol of the address or location symbol.
- Select color to highlight point—Define the color used to highlight the point symbol.
Note:
The widget uses the pop-up defined in the map on the Information tab. You can enable one or both layers to have pop-ups. Whatever is defined will be displayed on the Information tab. - Select layer—Click Set to define layers. On the dialog box, define the following parameters:
- Optionally, in the Directions Settings section of the widget configuration, set up the widget to use routing, which gives you the option to get driving directions to the selected feature. To configure the Directions Settings section of the widget configuration, specify the following options:
- Routing Service—Click Set and browse to a routing service in your ArcGIS Online organizational account or provide the URL to the routing service.
License:
The ArcGIS Online World Route Service consumes credits. Before generating routes using this service, open the Attributes tab of the configuration of your Web AppBuilder application and configure Subscriber content access with the URL of the routing service used by your widget.
- Direction length units—Select the units used to display directions (kilometers or miles).
- Select symbol to display route—Select the display symbol, color, style, transparency, and width used for the route.
- Routing Service—Click Set and browse to a routing service in your ArcGIS Online organizational account or provide the URL to the routing service.
Note:
Routing parameter settings in the web map has been removed in ArcGIS Online 7.2. This parameter is configurable in the District Lookup widget under the Directions Settings tab.
Use the District Lookup widget
- Click the District Lookup widget icon to open it.
- Search for an address in the search bar or click a location on the map to define the location.
When a defined location is within the polygon layer, you'll see information about the point feature and the related polygon highlighted on the map.
The map pop-ups are defined for each layer on the Information tab.

- Click the Directions tab if the widget is configured to provide driving directions, and it will provide driving directions to the selected feature from the defined location.